 | 1) New document |
 | 2) Use these settings Drop Shadow; Outer Glow; Inner Glow, Bevel & Emboss; Color overlay. |
 ............................End. | 3) Final Image with whole text. |
Making Text Effect (meebu fx)
![]()
Red Text Fx in Photoshop
| |
 | 1) Open a new document 500 X 500 white background. Type any word you like with balck color. |
 | 2) Bevel settings. |
 | 3) Contour settings. |
 | 4) Stroke settings. |
 | 5) Drop Shadow settings. |
 | 6) To add the following effect just select the layer of your type and contract it by 3 to 6 pixel than just follow the red text tutorial here. |
...................................End. | |
![]()
Glow text Effect in Photoshop
 | 1) New Document, |
 | 2) New layer, select the Horizontal Type Tool (T) and write whatever you like.. |
 | 3) Right click on the layer then select outer glow. Choose blue color hex: #0099FF; opacity 100%; spread 15% ;size 24px blend mode color dodge. |
 | 4) Duplicate layer and change the color and settings: Color hex: #0066CC; opacity 100%; Spread 0; Size 13 blend mode Screen. |
 | 5) Duplicate layer and change settings/color. Color white; opacity 100%; Spread 0; Size 3px blend mode color dodge. |
 ...............EnD................ | 6) Thats it you can add a gradient/stroke/bevel to your text. |
![]()
Making abstract renders in 3d max and photoshop ( Tutorial )
| |
Before you start: You need photoshop and 3d max. This is one long tutorial so get some soda, put on a movie and relax. ;) Step 1 Make the shape Now we have something like that. Simple huh well now we have to add modifers to it to make it all abstract. So while the Geosphere is selected goto the modifers window. Now to add the modifers to get the shape we want. First add Noise. You need to change the settings to get the shape you want. Those are the settings I used and this is what I got from those. That is what kind of shape we want to make the best abstract design. Its sharp and looks damn cool right now. :) Also add a smooth mesh modifer too to make it nice and smooth. ( View image for all the settings ) Step 2 Create the abstract Now we will create the abstract shape that we will make our render from. See out main finished render is not one complete 3d max file but a large number of the same render put together in photoshop. Ok now that is all cleared up we must duplicate the shape we have a it will all start to make sense. Ok this one is simple, select your shape and hold shift and simply move it to the left or right to copy it. Now we have to add more modifers. So select all you shapes at once and goto the modifers window. We will first add TWIST. That is the shape I got after I added the twist modiger. here are the settings I used to get the effect. So now we have some crazy abstract shape. Look cool, but not nearly as cool as we can make it. Well one thing, if your shape doesnt look anything like mine dont worry cause the effect will be different each time you do it. Plus you can also add more modifers such as bend to get more effects. Ok so now copy that shape like you did before. But make sure you have all of them selected. You should get something like this. Remember you dont have to copy me exactly. Step 3 Field of view Rendering!! Render it again and again Examples of the render in different angles. Take note that render I made is very smooth and doesnt have a nice sharp angles and points and it doesnt look that great. That means I should have spent more time on my render and more time on the Noise modifer and tried to get it to be sharper. Dont worry you can always fix that. Just start over :) It takes a few tries to get it right. ( View image ) Photoshop Now open photoshop and open up all the renders you made. Make a new 1600x3000 canvas and start adding your renders. This is where it all comes together. So here we go. You made 5 or 6 renders right? Now add them to the blank canvas and move them around and resize them and rotate them around and stick them together to get a nice image. That's it :) |
| |
.......................................................END............................................................... |
![]()
3DStudio Max Modelling tutorial
This tutorial should cover the full details of my method of modeling in 3d studio max. Note that this tutorial has been made in reverse starting with the final model (due to post-create demand for a tutorial) so the views you may see not look the same as yours also the specifix numverics on arrays are estimated.
Step 1:( View image )
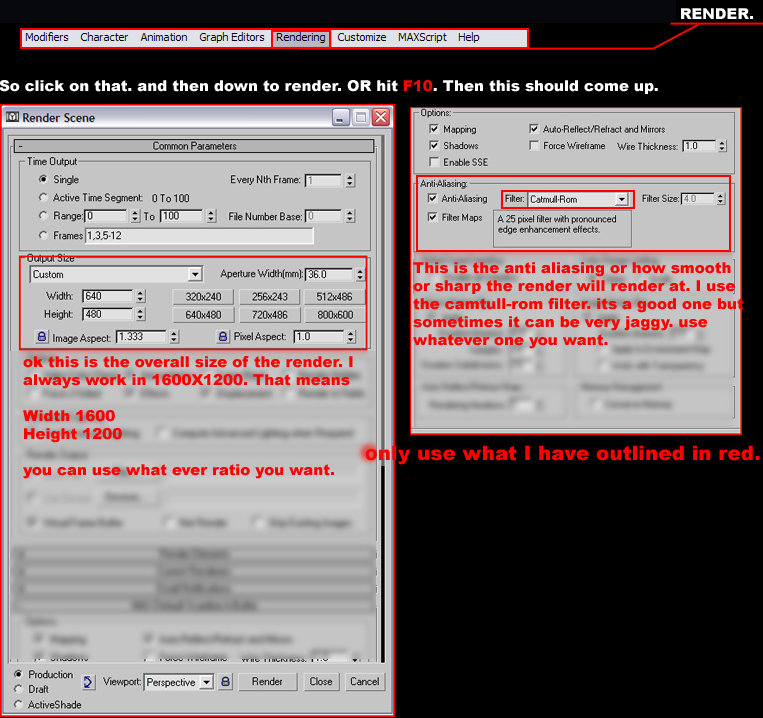
Press f10, and set the required size of your render (ie 1000x1600) press close go to customize --> viewport config go to the safe frames tab and select show safe frames in active view now the canvas is set up.
Step 2:( View image )
From the standrad primatives create a torus, and angle it approximately like so ignore where the ground is in the image - its is reverse-engineered) create another torus within the first as shown.
Step 3:( View settings )( View image )
Group the two objects and apply a modifier --> Noise seed 1 x-strength 300 the result is shown above.
Step 4:( View image )
Use a Tools --> Array : Move x -40 y +15
Step 5:( View image )
Group the whole arm and apply another array rotate x+30 y+30
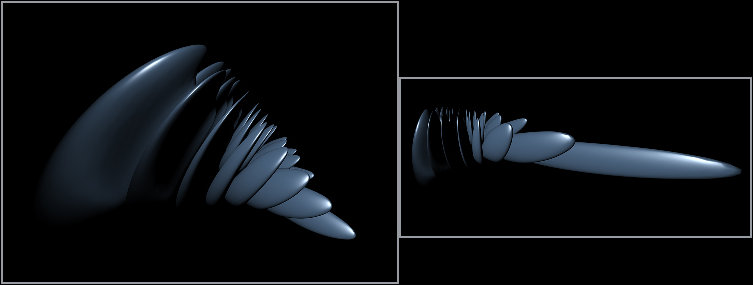
Step 6:( View image )
Groupe the 'spiral' and duplicate twice, move one just behind to build up the front structure with the second move it above. Behind and slightly rotated the fill more of the future canvas.
Step 7:( View image )
create the standard omni-light and position low on the right to create dramatic lighting across the front objects.
Step 8:( View image )
Heavily increase the "field of view" level and zoom back in until you achieve something similar to above.
Step 9:( View settings )( View settings 2 )
Under the materials set the ambient and diffuse colors to a nice blue/green set the specular level to 100 and the glossiness to 30. Under the material map set the opacity with a standard perlin marble map at 100% apply this material to all of the object groups
Step 10:( View image )
Press f10 and render
.............................................................END.............................................................
![]()
CG Clothes Tutorial - Photoshop tutorial
CGing clothes is directly the same as CGing skin , when CGing different colors, keep colors on different layers (i.e Red shirt on Layer 1, Blue Jeans on Layer2) this helps to keep the colors from accidentally blending with each other..
1. Create a new layer. Using paintbrush on 100% opacity, fill in all the clothing areas of the desired color base. Don't worry about the sloppiness, it will be fixed later.
2. Using a midtone (slightly darker) shade of your base color with paintbrush on 25% opacity, shade in the areas that would have shadows. Afterwards, switch the opacity to 50% and continue (Use same shading technique as the Skin shading - this can bea bit sloppy too.)
3. Next, using a deeptone ( darker than midtone ) with the paintbrush back to 25% opacity, add shadows ONLY where it would be darkest. Use this deeptone to detail the shadowing.
4. Now, Blur all the shadowing you just did - this creates the smooth gradient instead of the cell shaded type of CG.
5. Take the Dodge tool on Highlights and 50% opacity, Sparingly highlights the areas that would reflect sunlight.Blur the highlights afterwards.
6. Erase all excess stuffs.
......................................................................END.............................................................................
![]()
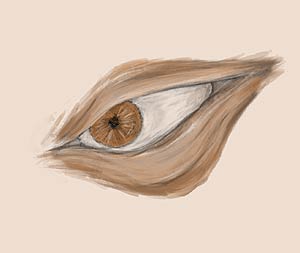
Eye Painting tutorial in photoshop
This will take you through the process of painting an eye. As usual I strongly recommend using a tablet. | |
 | Here I started with a hand-drawn sketch. In lack of a scanner I took a quick photo of the sketch, hence the bad quality. You can make your sketch right in photoshop, painter or whatever software package you are using. Rough outlines are enough, but you should already give your eye a characteristic shape. |
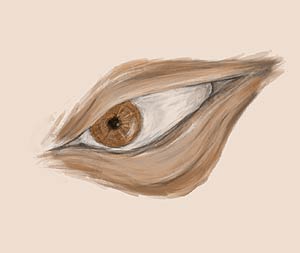
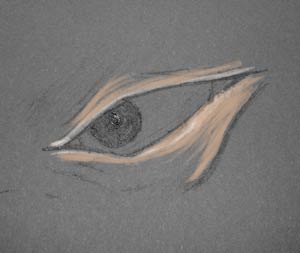 | Start to paint some thick strokes around the eye, a standard brush will be sufficient here, but of course you can experiment with your brush settings to make it easier to paint. I made some brighter strokes to indicate where my light source will be. |
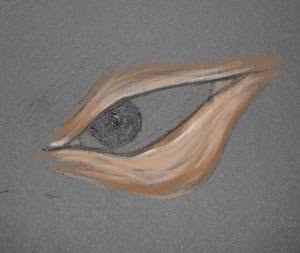 | I added a few more tones. I do not really care about my colour, since I will change it in the end anyway. Also I strengthened some of the defining lines. |
 | More lines to better define my eyes shape. |
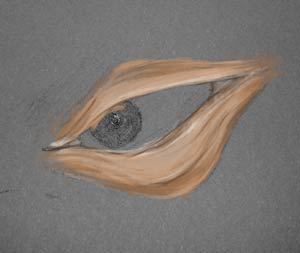
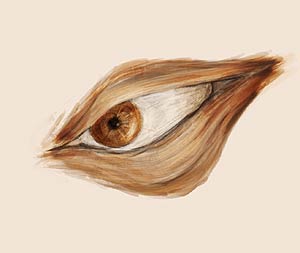
 | In this step I cleaned up the annoying background, and painted the eyeball. This is quite easy, keep in mind that it is a ball, so you will have to shade accordingly. The farther away you get from the pupil, the darker should it be. |
 | Now comes the most difficult part. The iris. First, start off by filling it with a solid colour. Then pick a small brush and make short strokes from the pupil outwards. Change your colour a few times here, if you look close at a photograph of an iris you can see lots of different shades and small strokes. This step determines how realistic your eye will look. The more and the smaller your lines, the more realistic will it look. Zooming in is a good idea |
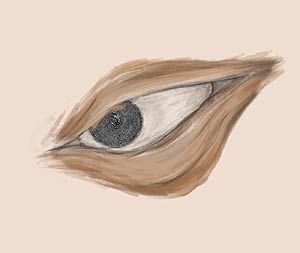
 | You might want to smoothen the iris a bit, the technique is up to you, you can smudge it, or, like I did, overpaint it a little. I also added highlight and darkened the pupil. The pupil got a small highlight too. |
 | What is left is to shade your eye. The shading will add plasticity and can also help to define the emotion which is expressed by the eye. If you go the easy way then pick dodge/burn, the more work-intensive, but better looking way is to add more layers and paint the highlights and shadows. |
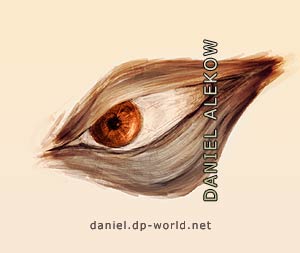 | This is what I have come up with, after some colour tweaking and some more work on the details. I hope this has been a help for you |
![]()
Circuit Effect - ( Photoshop tutorial )
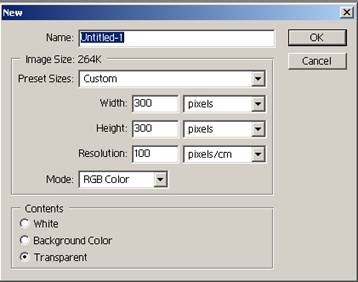
Step 1) The first step is to create a new images with 300pixels by 300pixels and a resolution of 100. Make sure that the content type is set to transparent. (you can make it whatever size you want but we'll use these dimensions for this tutorial.)
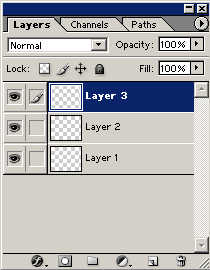
Step 2) In the layer window add 2 extra layers.
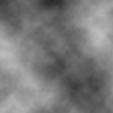
Step 4) Do the same in layer 2 and 3 by clicking on each layer and pressing Ctrl-F. each layer will be different but in layer 3 try to make it more light than dark by pressing Ctrl-F until you get it. They should look something like this. Layer 2 layer 3
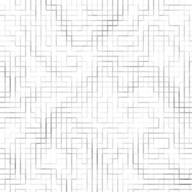
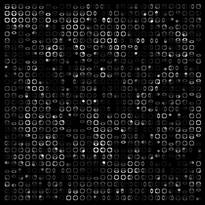
Step 5) Start with layer 1 and use the mosaic pixelate filter on it. Set cell size to 12 Layer 1 Layer 2 Layer 3
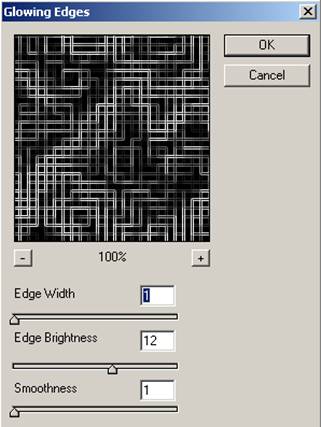
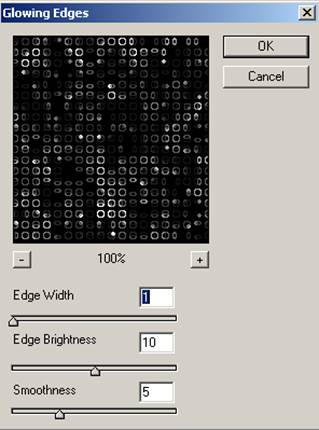
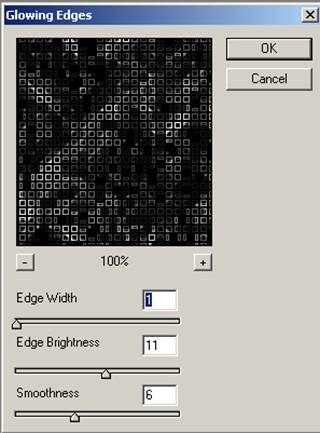
Layer 1 Layer 2 Layer 3 Step 7) Start with layer 1 and use the glowing edges filter,. Filters>Stylize>Glowing edges. Then continue with layer 2 and 3 by using the same filter. Follow images below, they contain the attributes for each layer's glowing edges filter. Layer 1 Now on to Layer 2
Layer 3
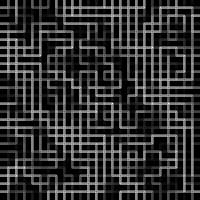
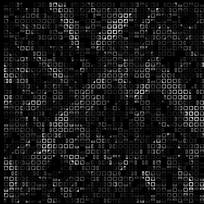
Step 8) set layer 3's opacity to 36% and layer 2's opacity to 70%. It should look something like this. All the images blended together.
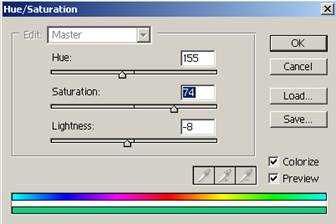
You can change the opacities to whatever you want to make it how you want it. Step 9) Flatten the Image. Layer>Flatten image Step 10)Change the hue of the image to make it look “computery”
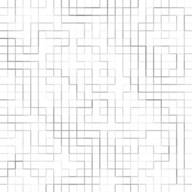
Finished - the finished product should look something like this…
| |
| ....................................................................END............................................................... |


![]()
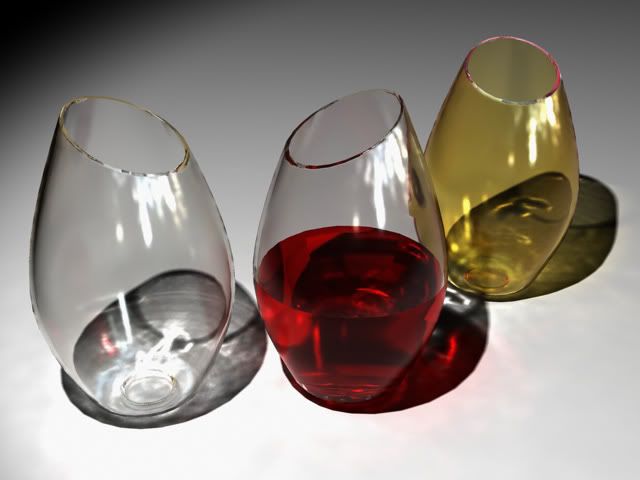
3D Max Tute(Creating a glass)
Creating a glass object with
Max and V-ray
This tutorial, very is simple, but I guess it will help on some people :). I will make a special glass using Max and for the renderer V-ray. Most of the people do glass by using lathe, my version is a little different. So here are the steps:
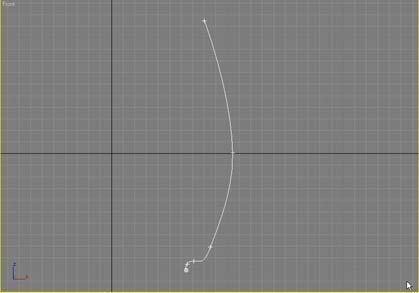
1. Create a line in front viewport that will be the profile of the glass:
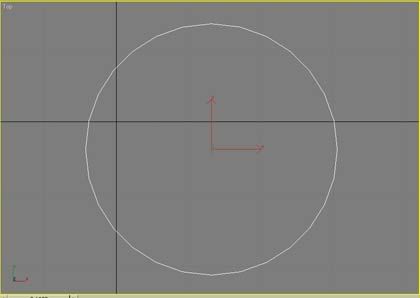
Draw a circle in top view
Select the circle, go to the Modifiers list and select Bevel Profile, and on Pick Profile, select the first shape:
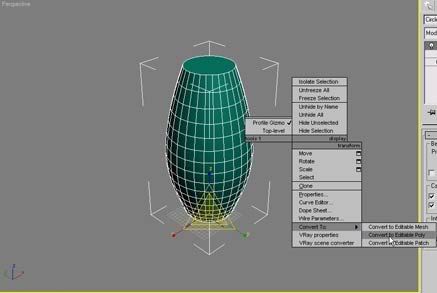
Convert this to an editable Poly select the top and delete

Go to Modifiers Panel and select Shell (is available only for Max 6 as I know), and adjust the thickness of the object how you like
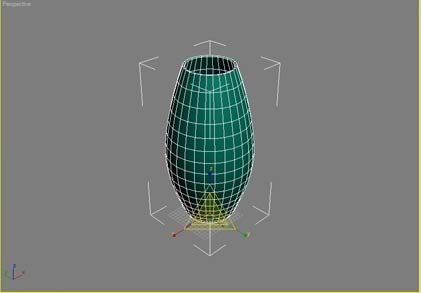
Now to make the special for of the glass we need to cut a little of the top, using booleans. We will use a box like so:

And go to Compound Objects and use Booleans
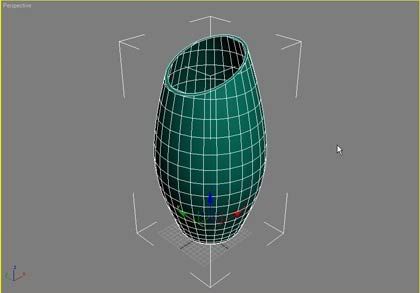
The problem is that now we have some artifacts - the face there is not ok. Deleting the face or the edge has now worked.
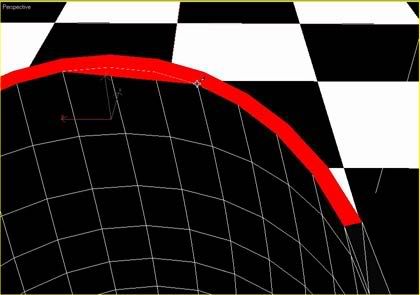
So we will insert a vertex or two on that line and use Target weld to the opposite vertexes to correct this.
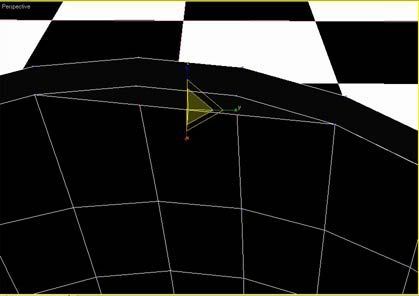
Same proble here:

Now all is ok. Select the edges and chamfer them twice, just a little. If you wish to make the bottom of the glass thicker just select the bottom of the glass and drag it down.
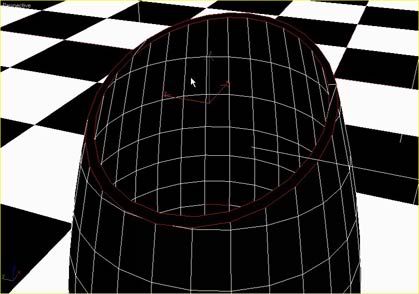
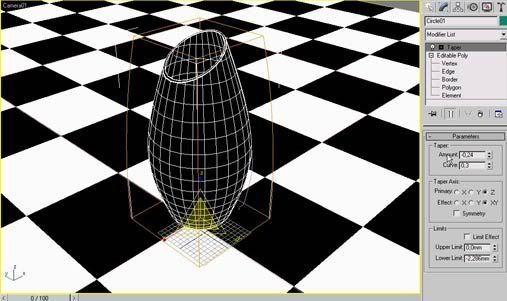
I have modified the shape of the glass by using the Taper tool from the Modifiers list.
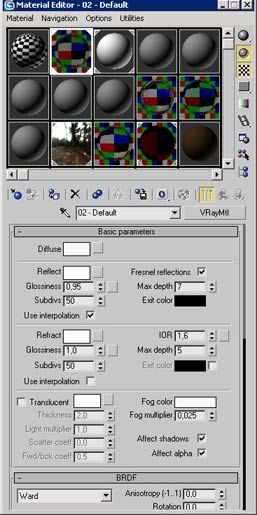
First choose V-ray renderer. Not fancy rendering settings, just in the V-ray: Image Sampler(Antialising), turn of the Adaptive subdivision. For the glass materials use this settings:
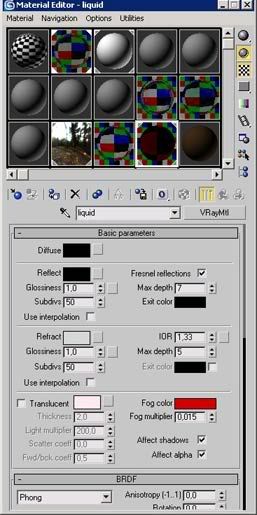
and for the liquid this
For the lighting I have used an Omni light, V-ray shadows cheked and on V-ray shadows parameters check Transparent shadows and area shadow. Use a plane for the scene and assign a white color to this.
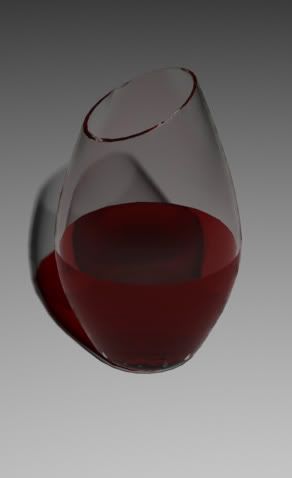
It looks fine, but not really :). The glass need something to reflect. To do this use a HDRI map. You can find some HDRI images at this address http://athens.ict.usc.edu/Probes/
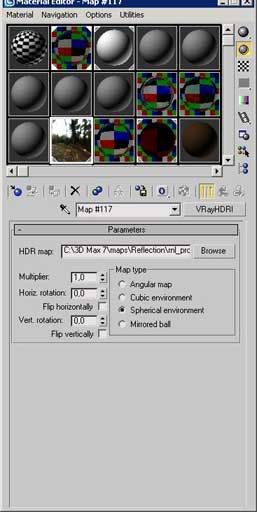
and assign this to V-ray Environment
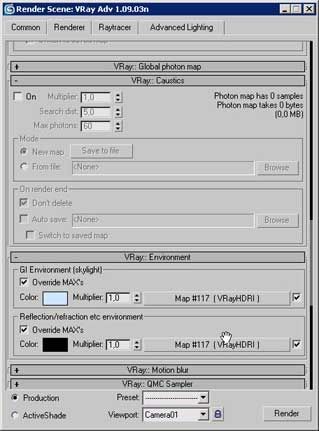
and the result
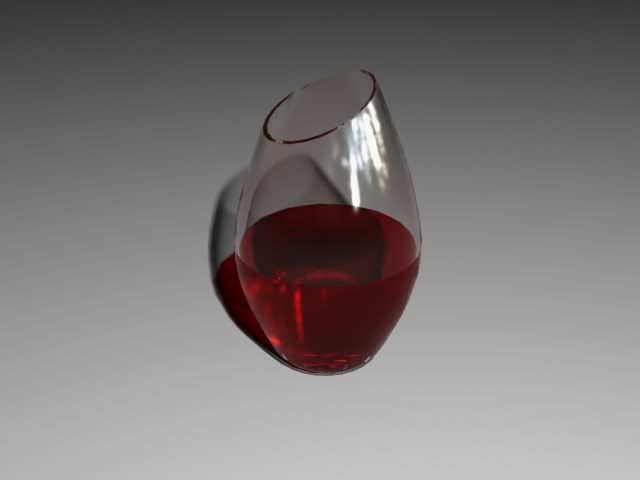
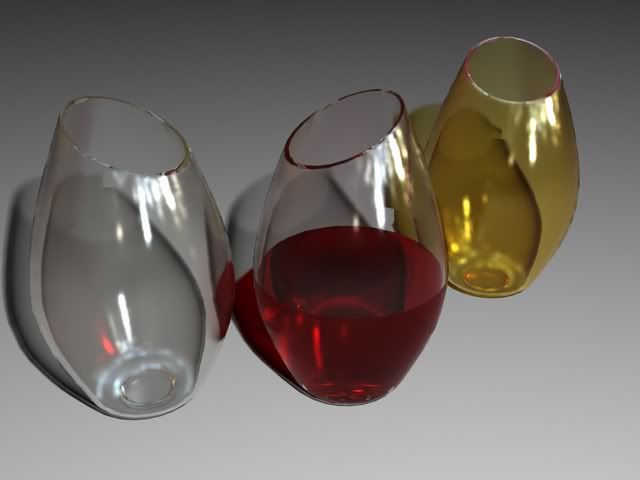
And with caustics the scene will look like this
Thanks for watching the tutorial!
![]()
Subscribe to:
Posts (Atom)

